We have seen a significant uptick in Cucumber usage across our customers and the QA Test Automation landscape in general. This uptick has been triggered by a variety of factors – increased Agile adoption, Cucumber’s easy to understand syntax, its support for TDD, BDD, etc. As the level of interest and skepticism (“This is too good to be true!”) rises, one of the many questions we’re constantly asked is “How does Cucumber automated testing work”? This short post will help answer this by laying out the core architecture and execution details for Cucumber Automated tests.
In the case of Awetest, we have actively supported and implemented Cucumber-based automation across web and mobile applications.
The Cucumber Testing Stack
For an overview of a typical Cucumber test suite we have the Cucumber Testing Stack, which allows for visualization of the hierarchy of your project, from features down to automation libraries.

The Cucumber Test Stack
The above diagram of the Cucumber Stack gives you a much clearer structure of the Cucumber tests.
The tests themselves are housed in Features – a text file with a .feature extension. Features are made up of Scenarios – scenarios are synonymous with a user story or test case(s). The Scenarios are made up of Individual Steps – Steps are nothing but the component interactions (or Test Steps) for a given Scenario or Test Case(s).
The Features, Scenarios & Steps make up the Business Facing components of the Cucumber stack – this the Front-End File/Document that Business Analysts-Developers-QA Analysts use to define testing requirements.
In order for the above Business Components to work (i.e. execute the test) there needs to be some underlying technology that executes the tests in a browser, mobile device, emulator, etc. This brings us to the Technology Facing components of the Cucumber Stack.
The Step Definitions essentially convert the simple English “Steps” into code that can be executed to perform the step. E.g. if the Step is:
Then I should see “Lou Gerstner” on the page
then there is some code that needs to be mapped to this step that checks the browser/DOM to validate if “Lou Gerstner” shows up on the Web page.
The code mentioned above is the Support Code that will be executed to perform the specific Step in the Feature file. Lastly there is an automation library that is used to automate the browser (or mobile application). Watir WebDriver, Selenium, and Capybara are all examples of Automation Libraries that can be used in conjunction with Cucumber to conduct your Automated tests.
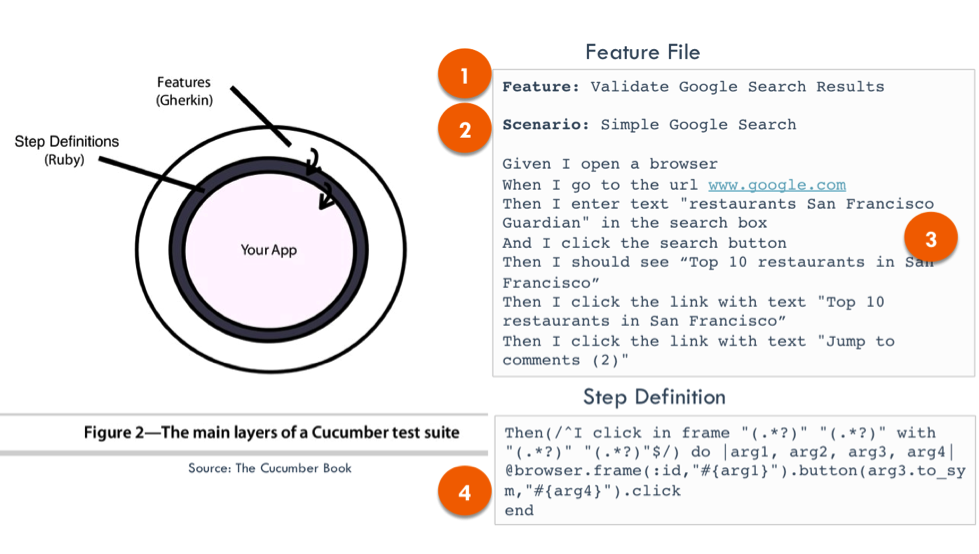
Layers of a Cucumber Test Suite
Below is a good representation of the main layers of a standard cucumber test suite and it maps to an example Feature File and Step Definition. We start with features (1), which contain our scenarios (2) and steps (3). The steps of our scenarios call step definitions (4) that provide the link between the Gherkin features and the application being built.
Cucumber Test Suite Layers
This is an example of a simple Cucumber Automated Test where the underlying code in this step definition is Ruby and the Automation Library is Watir WebDriver. Watir Webdriver is one of the automation libraries that is supported in Awetest. Another big reason for increased Cucumber adoption is the availability of the new Mobile Automation Tools like Calabash, Frank, and Appium, which are extremely capable and all have comprehensive Cucumber support.
Execution
Cucumber Feature files and corresponding step definitions are housed in a specific folder structure as displayed below:
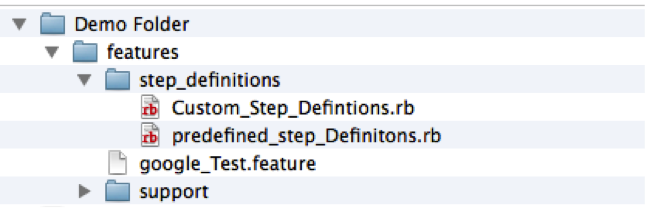
Cucumber Tests (Feature Files) are housed within the features folder and Step Definition files are housed in the step_definitions folder.
Cucumber is a command-line tool and to execute the tests you have to navigate to the parent folder (“Demo Folder” in the above example) and then execute the cucumber test by referencing the location inside the “features” folder
$ cd Desktop/Demo_Folder/

$ cucumber features/google_Test.feature
This will execute the feature file and the corresponding code within the step definition file(s). If the step executes without error, Cucumber will proceed to the next step in the scenario. If it gets to the end of the scenario without any of the steps raising an error, it marks the scenario as having passed.
If any of the steps in the scenario fail, Cucumber marks the scenario as having failed and moves on to the next Scenario. As the scenarios run, Cucumber shows the results making it clear to you exactly what isn’t working and where it isn’t working.